Cutting a New Bridge for an Old Fiddle
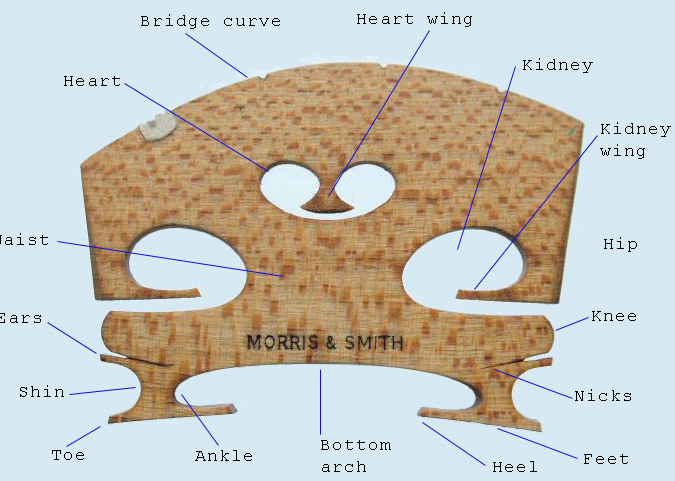
The following terms are used in these instructions. Two terms do not appear in the illustration that follows the terms: "Brand Name," but its meaning is clear, and "Estuaries," which are the open spaces that lie just below the Kidney Wings.
1. Bridge Curve
2. Heart
3. Heart Wing
4. Kidneys (right and left)
5. Kidney Wings (right and left)
6. Estuaries (right and left)
7. Waist
8. Toes (right and left)
9. Heels (right and left)
10. Brand Name
11. Hips (Sides, right and left)
12. Knees (right and left)
13. Outer Shins (right and left)
14. Inner shins (right and left)
15. Ears (right and left)
16. Feet (left and right)
17. Ankles (right and lef)
18. Nicks (right and left
19. Bottom Arch
Step 1: Fit the Bottom of the Feet to the Top of the Fiddle
A. Use low-tack masking tape to attach a sheet of white paper about 30 cm long and 5.5 cm wide, just large enough to cover the position of the bridge and extend under the fingerboard and under the normal position of the tailpiece. Leave the inner notches of the f-holes visible. (They mark the position of the bridge.)
B. Use normal masking tape to secure a strip of 220 to the white paper on top of the fiddle, about where the bridge will sit but longer, reaching under the fingerboard and under the normal position of the tailpiece.
NOTE: "220," "400," etc refer to sandpaper grit. For example, "220" means "220-grit sandpaper."
NOTE: Do not allow the normal masking tape to touch old spirit varnish on the fiddle. It could pull some of the varnish away when you remove the tape.
C. Mark over the bottom of the feet of the bridge with a pencil to darken the bottom of the feet (so you can see any areas where wood is removed), put the bridge in a foot fitter at “the correct angle.*” Make certain that the brand name of the bridge faces the position of the tailpiece. Move the feet of the bridge back and forth on the 220 to a count of about 25. Check to see if the all of the pencil marks are gone from the bottom of the feet. If not, do another count of 25. Keep this up until the bottoms of the feet look clean.
*NOTE: “The correct angle” is at a right angle to the point on the top where the bridge stands, but since the top is sloping down at that point, the bridge looks like it is leaning slightly toward the tailpiece. I cut a small “square” to help me set the bridge at the correct angle.
NOTE: If the bridge blank does not have a brand name, consider using a leather stamp to give it a brand name side, which is always set up facing the tailpiece.
Step 2. Enlarge the Estuaries
Use a sharp Exacto knife and a fingernail file to carve away at the bottom sides of the estuaries (left and right) until they look more or less like they did to start with but are 2 or 2.5 mm wide (instead of 1 mm wide). This carving will leave the outer edges of the tops of the hips sort of flat (that’s good). Clean up the rough spots with a fingernail file or 400.
Step 3: Sharpen the kidney wings
Use a small chisel to Sharpen each kidney wing. Start even with the outer edges of the kidneys and slant in toward the ends of the wings to remove about half of each kidney wing. Turn the bridge over and repeat this process on the other side of the wings. Each kidney wing should slope toward a sharp point. Examine the wings carefully to make sure they are about equally sharp.
Step 4: Sharpening the Heart Wing
Place the bridge on a hard surface (to keep the heart wing from breaking off) and sharpen the tips of the heart wing.
CAUTION: If you are using a cheap bridge, you may want to leave the heart wings alone. They break off easily.
Step 5: Enlarge the Kidneys
Draw over the upper parts of the kidneys to visualize how you will enlarge the kidneys. Put the bridge in a vice, and use a round file to enlarge the kidneys. Try to make both kidneys look the same. Clean up the rough spots with jeweler’s files.
Step 6: Cut a Low Curve into the Bottom Arch
Stick with the vice. Draw a low curve onto the bottom Arch (+/- 80 mm radius). Using a small flat file, make the bottom arch slightly deeper than it was to start with.
Step 7: Enlarging the Shins
Using a chainsaw sharpening file, enlarge the outer shins until the outer edge of each toe and the outer edge of each ear is about 1 mm thick.
Step 8: Rounding the Ankles
Round the outer edges of the shins slightly with the chainsaw file. Then use a round jeweler’s file to slightly round the inside edges of the ankles. The ankles do not need to be round, just “somewhat rounded.”
Step 9: Rounding the Wood Just Above the Heart Wings
Use the round jeweler's file to slightly round the narrow shaft of wood that extends down to the heart wings.
CAUTION: If you are using a cheap bridge, you may want to leave the heart wings along. They break off easily.
Step 10: Rounding the Knees
With jeweler’s files, round the outer edges and the lower sides of the knees so each knee looks a bit like the side of a bowl. Then use thin strips of 400 or 800 micro-grit (Micro-Mesh) cloth to smooth these rounded areas out. Leave the ears square
Step 11: Extending the Nicks Between the Knees and the Ears
With a sharp-edged jeweler’s file, carve out a line that bisects the “V” between the knee and the ear. This line should be about 3 to 5 mm long and should be on both sides of both knees/ears running parallel to the bottom sides of the estuaries.
Step 12: Fitting the Strings to the Bridge
A. Hold the bridge in its normal position (between the inner notches of the f-holes), and lay a pencil on the fingerboard with the point touching the bridge. Move the pencil back and forth on the fingerboard to draw a rough arch on the front side of the bridge.
B. Draw another arch about 2 or 3 mm higher than the one you just extended from the fingerboard. Use a belt sander to remove wood from the original bridge curve of the blank down to the arch that is 2 or 3 mm above the extension of the fingerboard.
C. Use a piece of plastic or something that is just under 35 mm wide and shaped like a T-square on the bottom. Set it on the bridge, even it up with the feet, and draw two vertical lines 35 mm apart and equal-distant from the center of the bridge. Use a small round jeweler’s file to cut small notches where each line meets the bridge curve.
D. Put a paper towel pad under the tailpiece, and tape it in place with low-tac masking tape. Install the tailpiece and the 1st (E) and the 4th (G) strings. Fit them into the notches on top of the bridge arch. Check to see how high these strings are above the bridge-end of the fingerboard.
NOTE: For a violin, the standard heights of the strings above the end of the fingerboard are (E) 3.5 mm and (G) 5.5 mm. I like my fiddle strings to be a bit closer to the fingerboard, (E) 3 mm and (G) 4 mm.
E. Place the bridge in a vice and use a sharp-edged triangular file to cut the notches for the E and G strings straight down into the bridge (following the vertical lines drawn in step C). File a little and recheck the height of the strings above the fingerboard. Keep filing and checking until the 1st and 4th strings are the proper height above the bridge-end of the fingerboard.
F. Use a bridge pattern (low-arched fiddle, medium-arched fiddle, or full-arched violin) to draw the new arch on the bridge, in line with the notches for the E- and G-strings. This will be the final arch.
NOTE: Most fiddlers have a preferred bridge curve. Think of the curve as an arc from a circle with a certain radius. My three bridge curve patterns are arc from circles with radii of 80 mm (fairly flat), 55 mm (medium), and 42 mm (the maxium curve for classical violins).
G. Use a belt sander and 120 to remove the wood down to this newly drawn curve. Remove any rough edges with 400.
H. Use a belt sander and 120 to remove wood from the front of the bridge (not the brand name side) until the top arch is 1.5 mm thick and the feet are 4.5 mm thick. Try to thin the front side of the bridge so that no hump is seen between the feet and the arch. In other words, the front of the bridge, like the back, should be reasonably flat.
I. Use the belt sander and 120 to bevel the hips of the bridge so they are shaped like half of a hexagon.
J. Install all four of the strings over the bridge. Tighten them somewhat, but do not tune them all the way up. Make sure the 1st and 4th strings are in their notches. Move the 2nd and 3rd strings around until you are certain that all four strings are equal-distant from each other. Hold the strings against the top of the bridge with one hand. Draw a light pencil mark on either side of the 2nd and 3rd strings, remove the bridge, and cut small notches between the marks using a jeweler’s file.
Step 12: Thinning the Bridge
Use the Belt sander and 220 to thin the bridge. Sand ONLY the plain side, NOT the brand name side. The top edge should be 1.5 mm thick, and the bottom should be 4.5 mm thick.
Step 13: Cleaning Up and Aging the Bridge
Clean the bridge up with an eraser and sandpaper. Examine it carefully and remove any rough spots with 400 or strips of 800 micro-grit (Micro-Mesh). Pour some “Coffee Stain*” into a small bowl, submerge the bridge in the coffee stain, and quickly dry the bridge with a paper towel, and a pipe cleaner, being careful to remove any excess from the kidneys, estuaries, heart, and pockets. Let it dry for 15 to 20 minutes—or 30 seconds with a hair dryer.
NOTE: *Coffee Stain: make it with 2 tablespoons of instant coffee, 4 tablespoons of hot tap water, and 1 tablespoon of denatured alcohol.
Step 14: Strengthening the E-string Notch
Hold the bridge upside down, put a small drop of thin superglue on either side of the bridge right beside the notch for the E string. Touch the superglue to a paper towel to soak up any excess, put the bridge in a vice upside down, and allow the superglue to dry for an hour or more. (If the superglue fills the notch, recut the notch with a jeweler's file.)
Step 15: Installing the Bridge
Install the bridge, and tune the fiddle up. Remove the paper towel pad from underneath the tailpiece. Polish the fiddle with a soft cloth to remove your fingerprints.
THE END